
Friday

We've just announced a new Boot Camp workshop date on Facebook!
September 24, 2011
Dallas, Texas
We would love for you to join the ranks of this amazing workshop.
We promise we'll help you whip your camera skills into shape!
Details can be found on our new website pages >>>>
just click the links to the right!
September 24, 2011
Dallas, Texas
We would love for you to join the ranks of this amazing workshop.
We promise we'll help you whip your camera skills into shape!
Details can be found on our new website pages >>>>
just click the links to the right!
Monday
Mamarazzi Monday
Location Location Location
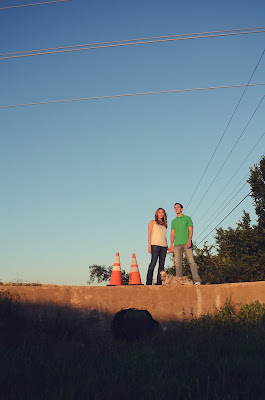
Q: How do you find cool/unique locations?
A: Jump in the car and take a drive. I don't think I can drive anywhere without something catching my eye.
Here are a few examples.
#1
Driving down the street... I notice two lonely cones sitting on a bridge... I add this spot to my mental list of "places to shoot".
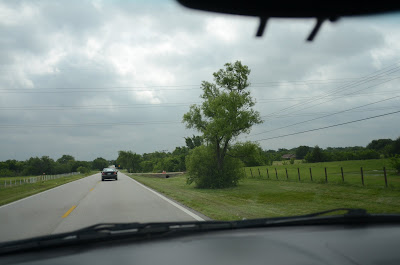
A few weeks later, I found the prefect couple to take there.
#2
In the middle of this field (very left of picture) there is a little patch of... bamboo? Well, I don't know what it is but I LOVE it!


I have wanted to shoot at this location for years... seriously. It was worth the wait.

#3
I LOVE when the leaves change in the fall. Unfortunately, it happens very late in the season here in Texas and it doesn't last long. Oh, and to top it off! Only select trees change color. The rest never get the chance and just die. These ones were in the middle of the road.

I didn't care that we would be standing between 4 lanes of traffic. The trees. The light. The colors. Perfection.

Bottom line. The location might not be traditional, but that doesn't mean it won't work. I tend to shy away from the "popular" spots. Instead I prefer to think outside the box and try something new. There are amazing locations all around us, you just have to train your eyes to see them.
I find inspiration in color, texture and light. When I see something I like, I make a make a few mental or written notes about it. Think the 4 w's.
What, When, Where, Who
-What location (cones, bambo, tree, alley)
- When to shoot. What time of day would be ideal for shooting at this location.
- Where is it. Many times I see awesome spots, but forget where I saw them.
3- Who. What type of session, couple, family, senior?
I hope this helped.
Sorry pictures are so small.
Mamarazzi Monday
Tracey did a one-on-one mentoring session and had a couple follow-up questions:
-Emily
And since every post is more fun with a picture, here is one from the session I've been editing today:

Do you keep both eyes open when taking a photo?
A: (I have to admit, I went and got my camera and took a photo to find out if I do or not) and the answer is YES I personally keep both eyes open when I'm taking a photo. Not sure if there is anything scientific to that, but more than likely it's because my favorite things to take pics of are KIDS and everyone knows that you have to keep both eyes open at all times when you're around kids. Or else you might get a Nerf dart to the face. Or a kick in the butt.
A: (I have to admit, I went and got my camera and took a photo to find out if I do or not) and the answer is YES I personally keep both eyes open when I'm taking a photo. Not sure if there is anything scientific to that, but more than likely it's because my favorite things to take pics of are KIDS and everyone knows that you have to keep both eyes open at all times when you're around kids. Or else you might get a Nerf dart to the face. Or a kick in the butt.
What is a good beginner book about photography? Any favs?
A: The book that changed my photography and opened my eyes to "what it all means" was Bryan Peterson's Understanding Exposure (huge thanks to my bro-in-law Jared for the best Christmas gift ever!). You can find it on Amazon HERE. It's in its third edition and it is absolutely the best book I've ever read, purchased, seen, or heard about regarding photography. Another one I found to be very helpful was Blue Pixel's Personal Photocoach. It was the first photography-related book I ever read and gave me a solid base of knowledge. It's on Amazon HERE.
A: The book that changed my photography and opened my eyes to "what it all means" was Bryan Peterson's Understanding Exposure (huge thanks to my bro-in-law Jared for the best Christmas gift ever!). You can find it on Amazon HERE. It's in its third edition and it is absolutely the best book I've ever read, purchased, seen, or heard about regarding photography. Another one I found to be very helpful was Blue Pixel's Personal Photocoach. It was the first photography-related book I ever read and gave me a solid base of knowledge. It's on Amazon HERE.
Where is a good place for developing my photos. Especially if I get a good shot and want a large print?
A: First of all, THANK YOU for realizing that Walmart just ain't gonna cut it if you're trying to get quality prints, especially LARGE prints. I can only explain this one way : Wal-mart, CVS, Costco, etc. do not employ people who care about photography. They employ someone who is there for the seven dollars an hour. They employ people who will look at a picture that's just been printed and say, "Oh wow, that looks like crap. Sucks to be that guy!"
Instead, a lab that employs people who know something about photography will not sell you that print. The person employed at the quality lab will look at that same print and say, "Oh wow, that looks like crap. Let me see if I can adjust my printer settings to help make it look better." Now, of course I'm not saying that they'll fix all your photography mistakes. But they will know how to improve color casts (so that your family doesn't look like oompa-loompas) and they'll work with you to be sure that you're satisfied.
If you are in a hurry and need something done locally, I've found that camera stores such as Ritz, Wolf, Cooters, etc. do a much better job than any grocery store/drug store/superstore. If you have the time, I would suggest going even a step further in quality and printing through someone like mpix.com -- the "little brother" printer of one of the best professional labs in the country.
Kristin asked : I only have a couple hundred dollars to spend. What type of equipment would be the best purchase for me?
A: You can't go wrong with a 50mm lens. They are sharp, fast, and provide the ability to take pictures in low light. Every time I start to think I'm bored with my 50mm lens, and switch it out for something different, I always come back to it very quickly because you seriously can't beat the quality and the sharpness. It will take some getting used to, because it doesn't zoom (that's what's called a prime lens... when it only has one focal length) and so you have to move yourself to get the shots you want. But it is WORTH IT! Both Canon and Nikon have versions of the 50mm lens that retail for around $150.
(Edited to add: Kristin already had a camera that she loved, and she'd been using the "kit lens" that came with it. So she was asking about an upgrade to her existing equipment, not starting from scratch!)
Keep those questions coming~ and check back with us every week for another Mamarazzi Monday!
-Emily
And since every post is more fun with a picture, here is one from the session I've been editing today:
Mamarazzi Monday
Everyone wants better images, right? Here are a couple of SIMPLE editing tips that will help you take your pictures from snapshots to frame-worthy prints.
Inherently, our digital photographs have less of two things than their film counterparts : CONTRAST and SHARPNESS. (I'm thinking 'sharpness' isn't a word, but let's pretend here!)
Simply put, if you add some contrast and some sharpening to your photos, they will pop a little more!
Contrast is the amount of difference between the lights and the darks in your images. More contrast equals more of a difference. (Lots of contrast is especially obvious in a black and white image.)
Sharpening is just that -- making the image more crisp or more sharp. Please note, generally speaking a blurry image can't be saved by sharpening. There is a difference between a slightly SOFT image and a BLURRY image. Generally, a soft image can be improved (rarely perfected) by sharpening, but a blurry image is not going to be improved by sharpening.
Here are the screen-by-screen steps for adding contrast and sharpening. I am using Photoshop CS3, so your editing software may look very different. However, most editing software programs will allow you to do these steps, just in perhaps a different way. Google is a good friend if you get stuck on how to do this in your particular program. :)
Here is the first image, of my little Sophie. This is straight out of camera (but is cropped).
 (Aperture : F/2.5, shutter 1/4000, ISO 640. Shot with my 50mm lens on my D700)
It's a cute image, but could use a little help!
The first thing I'm going to do is Sharpen. Personally, my favorite sharpening tool is the Unsharp Mask.
Filter>Sharpen>Unsharp Mask

You can easily go overboard with sharpening, so be sure to use both the "zoom" box inside the pop-up box and be sure that your "Preview" box is checked (I circled it in red). That way, you can see in real time how the sharpening is affecting your image. The goal is to enhance the crisp-ness of your image, not make it look un-natural. As far as settings go, I try to keep my radius under 3.0 and my amount around 50-60%. I definitely never go over 3.0 and 100%. But generally, if my original image isn't terribly soft I will do about 1.8 or 2.2 and 55%.
In this case, it is at 59% amount and 2.8 radius.

The second part of my quick and easy editing process is Contrast. There are several ways to add contrast to your image. For simplicity sake today, I'm going to show you the most direct way to adjust Contrast.
Image>Adjustments>Brightness/Contrast

If needed, this is also a great place to lighten or darken your image (use the Brightness sliding scale). Add contrast with a positive number on the Contrast sliding scale. Don't forget to keep your "preview" box checked and watch the change in your image!
I usually click the preview box on and off to watch the change (when it is not checked, you can see the unchanged image... so it helps to see how far away from "original" you're getting).
This number is entirely a matter of preference... you'll find that some images need more and others will need less. Just keep an eye on that preview box!

Here is the end result. It was an easy way to add a bit of pop to this image without having to do extensive editing.

 A little note : To me, whenever you sharpen an image you need to be sure to prepare for the fact that everything will be sharpened and therefore more noticeable, including wrinkles, grain/noise, blemishes, etc. That is one reason to keep a light hand when sharpening your images! (After adding sharpness and contrast, I will usually do some skin-smoothing. My favorite way to do this is with MCP Action's Magic Skin action set, specifically the Powder Your Nose action.)
Here is another example, again with little Sophie. This is her first time in a big-girl bath :) See if you can follow along with the steps, without the play-by-play instructions.
 (Aperture : F/1.4. Shutter : 1/400. ISO 320. Shot with my 50mm on my D700)


You can see that the difference is subtle, which is what you want.
If you have any questions about this, or any other photography questions, please leave a comment! Happy Monday!
If you have any questions about this, or any other photography questions, please leave a comment! Happy Monday!
**This is a bit of a learning curve for me, I've never done screen shots before or even a step-by-step tutorial. You may have even noticed that one of my items on my menu bar at the bottom of my screen shots is a Wiki article called "How To Take a Screen Shot." Rookie mistake. Haha!**
Mamarazzi Monday
Q: How do I get my subjects eyes to light up? Sometimes they look so dull.
A: The light in eyes is called "catch lights". It's a reflection from light. The best way to achieve catch lights in your subject is to turn them so the light source is reflected in their eyes.
When I was just starting out, I would turn my subject in a circle, following their eyes until they lit up. The more you practice the better you'll get at finding them naturally.
In this example, I turned my subject toward my light source.
Want to be a part of our Mamarazzi Mondays? Got a question or want to know our tips and tricks? Email us!
MamarazziBootCamp@gmail.com
(subject line Mamarazzi Monday)
Friday

Your children are only young once.
How are you preserving your memories of this once-in-a-lifetime stage of their lives?
With dark, blurry, or just plain bad photographs???
There is an obvious reason why your photographs are so important: these moments only happen once. Let us help you improve your photographs. Let us help you learn to use that amazing camera to its full capacity. Let us help you Click It Up A Notch!

Thursday

**In order to facilitate a more personal learning experience, class size is extremely limited. Join the ranks today, before the workshop is full!**
MAMARAZZI BOOT CAMP
Fall Class Schedule coming soon!
Who can participate?
We invite anyone who is interested in improving their photography skills to join us for this amazing workshop! This is considered a beginning-to-intermediate class. Please note that although it is recommended, it is not a requirement to have a DSLR camera. (A DSLR camera is one that has interchangeable lenses.) However, your camera must allow you to manually set your aperture and shutter speed in order for you to get the most out of the workshop. In addition, the format of this class won't allow us time to spend on the settings and dials of your individual camera. If you are interested in receiving help with learning the ins and outs of your specific camera, that would be best done during a mentoring session. Please contact Emily Murdock or Stephanie Read for more information regarding mentoring sessions. Workshop participants can receive a discount on mentoring sessions -- be sure to inquire about this opportunity!
You do not need to be a Mama (or even a woman for that matter!) to participate in the class. There will be specific tips presented regarding how to photograph children, but it will not be the only information covered. Everyone can benefit from this workshop!
What will the workshop cover?
We will discuss the technical aspects of photography, including but not limited to aperture, ISO, shutter speed, white balance, and metering. We will also go into detail regarding creative composition, improving your photographs through use of light, and how to shoot like a pro! New for April 2011 Boot Camp, we will be discussing basic editing in both Lightroom and Photoshop Elements! We will have classroom instruction as well as a mini-shoot with models (models who are disguised as Boot Campers... sneaky!), where each participant will be able to ask questions and shoot alongside Emily and Stephanie.
What is the cost of the workshop?
$199
What are my options for payment?
Please use the convenient PayPal button on our website to pay for the workshop (you'll find it in the right-hand column). You do not need to have a PayPal account to pay through their secure website. If you would prefer to mail a check for your workshop fee, please contact Emily (emily@emilymurdock.com) or Stephanie (AuburnSoul@gmail.com) for more information.
Please note that the full fee is required to hold your spot for the workshop.
*In the unlikely event that the class does not fill to our minimum of 6 Boot Campers, your enrollment fee is transferable to any future Mamarazzi Boot Camp.*
Questions? Please don't hesitate to contact us!
Emily Murdock
emily@emilymurdock.com
214.830.0738
Stephanie Read
AuburnSoul@gmail.com
214.733.9461

Mamarazzi Boot Camp is enlisting recruits from all over the country!
If you can't make it to our one of our scheduled workshops, don't worry! We are currently planning workshops in other cities across the US!
We'd love to hear where YOU would like to have a Mamarazzi Boot Camp.
Would you like to be on the email list for information regarding our upcoming workshops? Let us know! Email us at mamarazzibootcamp@gmail.com
Tuesday

Emily & Stephanie each offer personal mentoring. Please email for price & availability.
Mentoring sessions can cover subjects such as Photoshop technique, camera technique, your individual camera settings and use, as well as portfolio critique.
We would love to meet you through a mentoring session and share with you our love of photography!
Sessions available in person or via email or phone

Emily and Stephanie, the boot camp was incredible—so worth the trip from NC! You two are the perfect pair, delivering a great balance of technical and creative tips. Your presentation was thorough and well organized, filling the day but still allowing room for open discussion. Thank you for being so candid with your ...insights as a professional—and for speaking to us as mamarazzi yourself (I love the whole discussion about technical perfection not always being the goal). I came away from the boot camp with way more than I expected and had such a fun time, too. You two are great! I highly recommend your awesome boot camp. Thanks so much!
-Tricia, North Carolina (Dallas Mamarazzi Boot Camp)Emily & Stephanie, thanks so much for a fun day a Mamarazzi Boot Camp! The class was well organized, extremely informative and very fun! Definitely worth a trip from NC to TX! Loved learning more about both the technical and artistic aspects of photography. Giving the group a glimpse of your post-processing techniques was an added bonus. Definitely felt like I attended a 101, 201, and 301 level class all in the same day. Appreciated your in-depth preparation as well as your flexibility to deviate from your presentation, based on our questions. Your style & approach lent to such an interactive day. It was a great learning experience and truly exceeded my expectations. Highly recommended!
-Brooke, North Carolina (Dallas Mamarazzi Boot Camp)A friend of mine saw an ad for the Mamarazzi Bootcamp on Emily's website and she knew I was interested in photography and that I wanted to take classes, but I am a single divorced Mom that works full time and didn't have time to take a regular photography class at the local college and I didn't want to take one online. So, when I heard about the Mamarazzi Bootcamp, I knew this was exactly what I had been looking for. I registered for the class and looked forward to it for weeks. Finally, the day of the class arrived.
I cannot even describe how much this class has helped me. Emily & Stephanie were so welcoming and made me feel so excited to learn. We started out with getting to know all of the ladies there and then jumped right into the class. Emily taught about the different terminology and definitions and technical side of photography. This was a great foundation to learning how cameras work, why ISO and shutterspead and aperture matter, etc. Then Stephanie taught us about the artistic side of photography, which was the frosting on a foundational cake. I love the laid-back feel of the class. I always felt comfortable asking questions and loved learning from Emily & Stephanie, but also other women taking the class. It was a great day and the time just flew by.
Then, it was time to put into practice all the things we had just learned. Shooting in manual mode was something that I had tried a few times before and had failed at miserably. However, after all of the great things I had learned from Emily & Stephanie, I was ready to tackle that obstacle that had always been looming on the horizon. I switched my dial over to "M" and just started shooting using all the great tools and knowledge I had just gained. I learned a lot during that photo shoot. Taking the Mamarazzi Bootcamp class helped me by leaps and bounds and I have just continued practicing and learning even more. Here are some things I learned:
- How to shoot in manual mode (this was a big step for me).
- Learning what the little meter inside the camera is for and to make sure the little indicator is as close to the middle as possible.
- How to meter for the background vs the subject.
- How ISO, aperture, and shutter speed work together.
- The importance of a good lens.
- How to compose a better picture so there's less editing to do later.
- Good ideas on how to save and back up pictures.
- Recommended websites for more learning.
I would HIGHLY recommend the Mamarazzi Bootcamp to anyone wanting to learn about photography. As I learned in the class, we are all ameteurs and every time you pick up a camera, there is something new to learn. I saw an immediate improvement in my pictures after taking the class and am just continuing to learn and improve the more I practice. Emily & Stephanie were such great teachers and made a potentially intimidating situation completely relaxed and comfortable. It was worth every penny!
~Lisa, Dallas, TX
Subscribe to:
Posts (Atom)

